Your Cart is Empty


Working with good materials and having the right tools for the right job go a long way to improve the final result of your completed pysanka. However, eggs can be fickle and tricky little things even for those with many years of experience. Sometimes, the eggshells refuse to cooperate, so never despair and take away the positive experience of learning something new. There is always something to learn and there is no limits to imagination.

Using farm fresh, free run eggs is the ideal choice for your canvas. Generally these chickens produce stronger and better shells than most store bought eggs.
However many people simply do not have access to this fresh supply. Besides having a thinner shell the greatest “defect” in store bought eggs is the way that they are processed. Subjected to a washing where each egg rests in a “cradle” that vibrates during the wash cycle causes an unsightly white or much paler band of color around the perimeter of the egg after it is dyed. Certain types of detergents may also affect the shell. Some eggs are actually subjected to bleaching and even a light coating of vegetable oil.
As a result, dyes often simply do not take as well on the eggs. The second issue is the pink or blue stamp on most eggs today. However if commercially produced store bought eggs are the only choice, try to get the Costco free run eggs.
If you are starting with either store bought clean eggs or farm eggs that have been hand washed in water, this is the time to have a really good look at them by candling. Regardless of what you use, LED flashlight, any bright light or an actual candling device, the light will reveal the weaknesses of the eggshell and whether it will be a suitable canvas. The most important things to look for are stress cracks that are invisible to the eye.
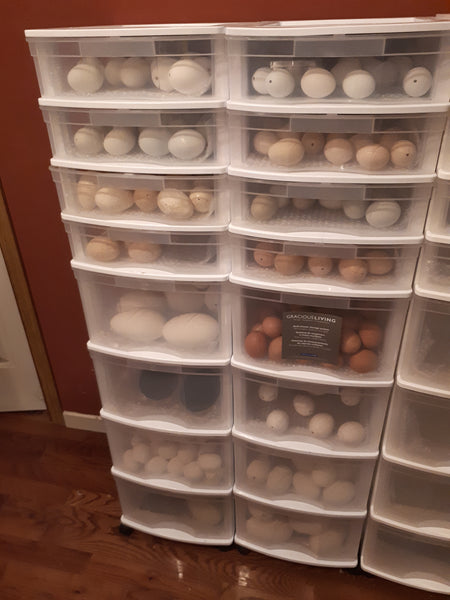
Experience will show that most eggs have some weaker shell areas and learning which are acceptable and which are real threats to the outcome of your pysanka is the challenge. Keep in mind that generally the weakest point in any eggshell is the pointy tip and it is the most likely spot of the thinnest part of your egg. Any egg deemed risky in my home is relegated as “fit for eating”. The others are stored separately in the fridge and are clearly labeled “not for eating”.
Living in a rural area I have ready access to purchase my eggs from several local farms. They are very fresh but can sometimes be a bit “messy’. I find it interesting that it is the white chicken eggs that tend to be the worst and the brown ones are consistently the cleanest.

The first and most important rule is to never work with eggs straight from the fridge. As they warm up, they will start to sweat and handling them can damage the cuticle or cause natural oils from the skin to transfer to the egg causing dye to be uneven and look smudged. Allow the eggs to come to room temperature. Then run several inches of lukewarm water with a couple of drops (not a squirt) of Ivory dish soap and a handful of baking soda and stir to dissolve well. (I generally wash anywhere from 3 – 4 dozen or more at a time.) Place the eggs gently into the water so they are fully submerged.
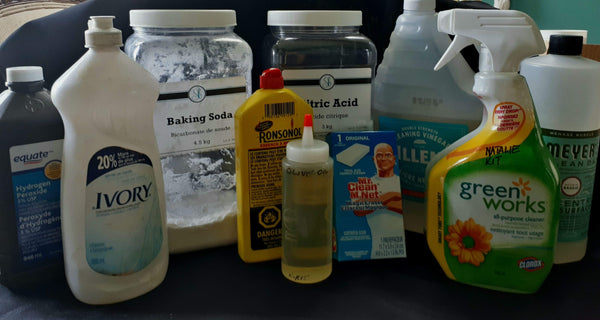
For these messy eggs, I wear unpowdered nitrile gloves. The gloves are great to ensure my hands remain protected and also provide a sure grip on both dry and wet eggs. I let the eggs sit for about 5 minutes or so, they do not need much longer. I used my gloved hands to wash them. If there are stains you may use a Magic Eraser to rub gently to remove it. If you do not have one, make a paste of baking soda and water and rub at the stained area until it is gone. I rinse well in fresh water and then give them a few minutes in a bath of water and some hydrogen peroxide and then rinse again under running water. Placed on a couple layers of paper towels they do not take long to dry off.
For store bought eggs, the process is very similar. If they are stamped, then the stamp must be removed. A paste of baking soda and water is very useful to removal the pink or blue ink. I have found that allowing the eggs to sit in lukewarm bath of water with a handful of baking soda and a few drops of Ivory dish soap helps “loosen” the ink stamp, about 10 – 15 minutes. Rubbing with a Magic Eraser does the rest. I have used just the baking soda paste but it takes quite a bit longer. Your egg is ready for the basic division after it has dried.

For duck eggs use water only; goose treat like chicken eggs and for best results with dyes, sand them working from a medium to super fine grit “wet” sanding paper. Turkey eggs have spots that can be removed with a light “etching” using vinegar, quail eggs need only a few seconds to remove the spots. Rhea and ostrich also need a light etching to remove the shiny layer and then sanded to a nice finish with the “wet” sandpaper. Always use a mask when sanding eggs as the egg dust is very nasty for your health.
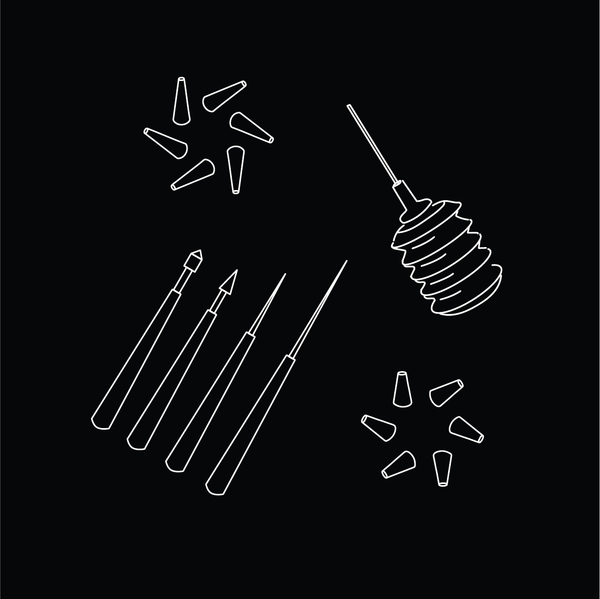
Once an egg has been washed, I avoid touching it with my bare hands. Natural skin oils will transfer to the shell interfering with dye coverage. I further avoid holding it in my hand while writing with wax. Heat transfer from the hand may cause smudging of beeswax lines and at a minimum some transfer of wax film or natural hand oils interfering with dyes. One commonly sees photos of people holding the egg in the hand while writing. There are practical reasons why I do not. I have learned to rest the egg on a soft cushion and support it lightly with the fingers of my left hand wearing the nitrile glove while I write with my right hand. (Lefties would be the reverse). I love my mechanical pencils for sectioning the egg and sketching in the design (no sharpening ever) but a good hard 4H – 6H high polymer pencil is also terrific. The high polymer content ensures easier removal of pencil marks after the wax is melted off.
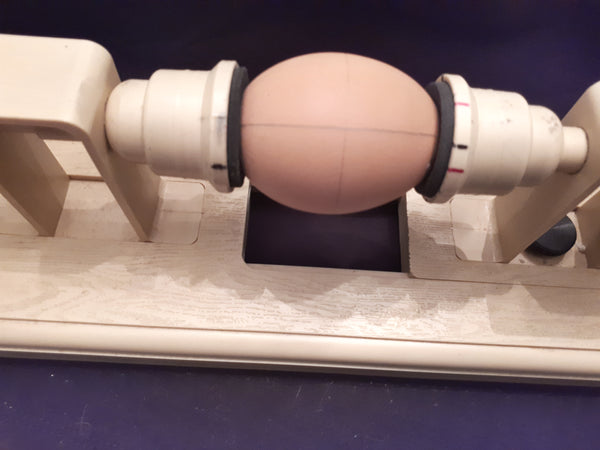
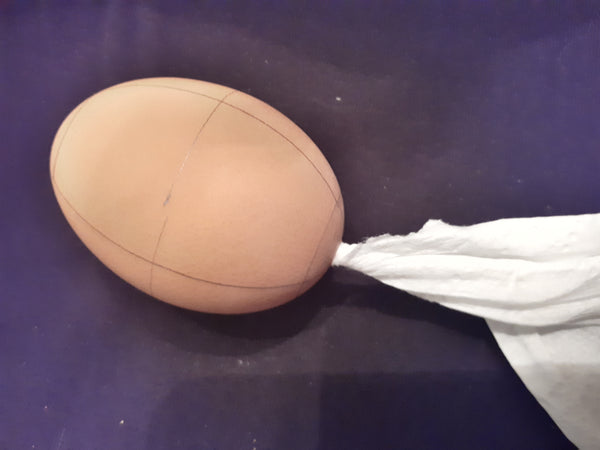
Using a lathe to divide the egg is fast and easy once you learn how to use it and the quirks of the egg. However dividing the egg can also be done manually “by eye”. Rubbing a soft B pencil on paper and then placing the tip of the egg and rubbing gently over the pencil mark, will transfer the lead to the center point on the top and bottom of the egg, an easy way for centering. Make a cross shape on each tip, top and bottom and join the lines to create an even and equal division. This takes practice but is achievable. A flexible measuring tape to check the accuracy of your division and round templates may also be used. A white polymer eraser can be used to lightly erase pencil mistakes from the shell. The pencil marks will come off after the wax is melted so do not worry too much. The white eraser is the only kind to be used.
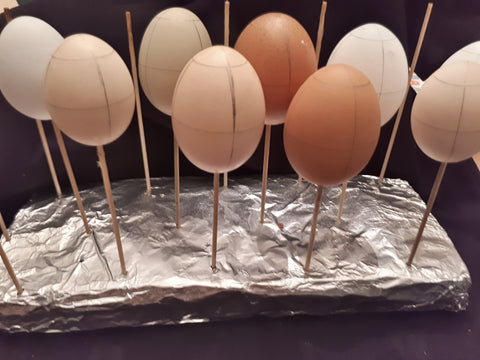
Due to the number of eggs I write, it is far more practical to prepare large quantities of emptied eggs that are already pre-marked on the lathe with a basic 8 division – they are always ready to go whenever I am. There are a many practical reasons that brought me to this point and I have not regretted my decision in the least nor do I feel inconvenienced working on empty eggs. The lathe further allows for additional sectioning of the egg into a grid for more complex and detailed designs. It takes me approximately 2 minutes to position the egg and balance it, drawing the circumference and then the 4 vertical quartering lines resulting in an egg divided into 8 sections. It does take practice and some eggs are just so oddly shaped.
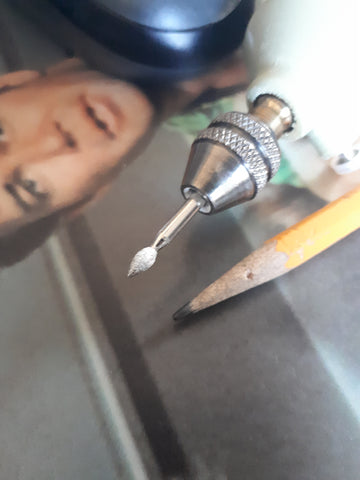
Once the eggs have been sectioned, they are then emptied. A mini drill or a Dremel type with a diamond bit allows for the drilling of a precise, small hole through which the contents are drained. It takes about 5 – 6 seconds for the hole to be drilled just the right size to fit on a skewer for drying and for later varnishing after the pysanka has been completed and the wax has been melted off. Moving the egg onto the bit rather than forcing the bit into the egg is key.
Next, the egg is emptied using a small hand pump that is fairly efficient. Progressively, one can move up to the next step of having a small aquarium pump do the work for you even more efficiently. Personally I do not recommend extraction of the egg contents through suction. With such a small drain hole, restricted airflow can cause the suction to create a sufficient vacuum to crack the eggshell. Pushing the contents out of the egg using air is gentler.
Regardless, even here caution should be exercised. Prior to blowing out the contents, the yolk should be pierced. I prefer to use a wooden skewer. When pumping, sometimes the white can be very thick, particularly with very fresh eggs, ease up if you feel any resistance. The membrane of the yolk may stop up the drain hole; pulling out the tip enlarges the opening sufficiently for it to pass. Sometimes pieces of the inner membrane lining the shell can loosen and fill the opening. Remove the pump needle and gently tug out the loose pieces. Trying to force out a clog can cause a stress crack. Being gentle around the drain hole will reduce the potential of any chipping.

The Dollar Stores have a very nice instrument I have found useful for washing out the eggs; it is a turkey injector. The needle is able to inject water into the interior of the egg to clean out the insides of the eggshell. I use plain lukewarm water for the first rinse and slosh it around doing this to each egg until the entire carton is done. I then mix up a large container of lukewarm water with a few drops of Dawn or Ivory dish soap and add about 1 tablespoon of Mrs. Myer’s concentrated cleaner. Once the initial rinse is emptied, this solution is injected next and also sloshed around one egg at a time until the entire carton is completed. I really like the way the fats of the egg yolk are loosened and wash out. Then the soapy solution is rinsed out again with plain water. My final step is a last rinse with a mixture of 10% hydrogen peroxide and water to sanitize inside the shell.
Once the final rinse is emptied, a twist of tissue is inserted into the drain hole and the egg is turned drain hole down to allow the moisture to be drawn out of the egg. After about an hour, the tissues are removed and the eggs are placed on skewers to complete their drying. My studio has an additional space heater as well as a fan to keep warm air circulating and for the eggs to complete their drying. Depending on weather and humidity conditions, 12 – 36 hours and they are ready for placement into my storage compartments to await design sketching.
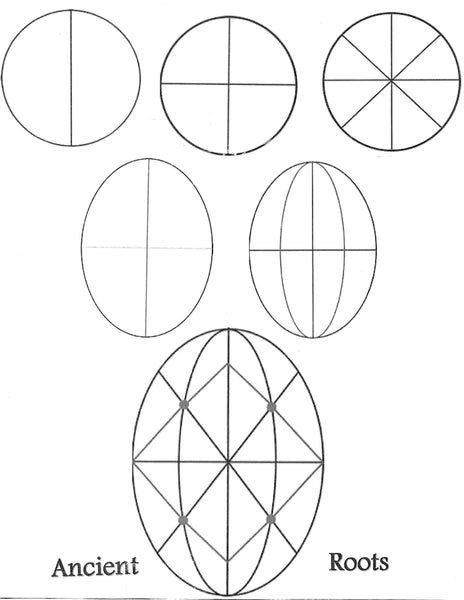
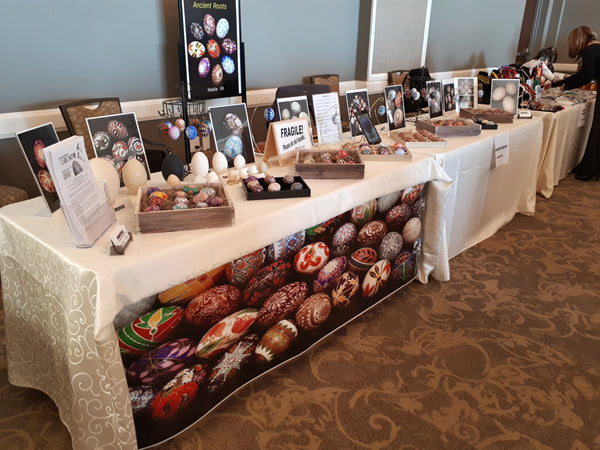
This is my preparation of the egg for pysanka writing. The next challenge is selecting a design and sketching it on the egg. This is one of the final steps of preparation and once your main design is sketched, it is time to begin. There is much work preparing to write a pysanka. I have included a 40 triangles division work sheet, a very structured division with its straight lines and triangles. It is very versatile and valuable, teaching about division and spatial geometry. It’s structure and the process of preparing your egg, provide a solid foundation to pysanka writing. Photos of completed designs from one of my recent pysanka workshops are also available to inspire your creativity and pysanka adventure, especially good for beginners.
My mother saw my fascination with pysanky early on and bought me my first electric in the mid-‘70’s. I hated it and did not want to use it but fell in love with the Ukrainian folk pysanka because of her. I continued to write with manual kistkas. I have always loved learning and well before the internet, wondered about new and different ways of doing things and started experimenting. I realized that I had allowed myself to become intimidated by my new tool and decided to see what I could do with the electric kistka. I too used to work only on full eggs, wary and reluctant to work on empty shells. But between 2000 – 2010 resulted in my first brush-shaded poppy inspired by my painting days, then bleaching, acid etching and creating original designs, brown egg designs, things no one in my community had seen before. I owned a lathe for over 15 years before really using it just this past year along with many other excellent tools. I encourage you to use this opportunity to explore outside your comfort zone and to push beyond your boundaries and see what you will find.
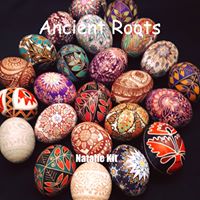
Ancient Roots: Pysanka Expressions, by Natalie K Kit: The pysanka writing tradition and preserving traditional Ukrainian folk motifs were learned from my Mother at age four. Continuing and developing for almost six decades, my pysanka art has evolved into a dynamic passion. From a traditional wax writing craft, I explore acid etching, scratching, brush shading and other techniques, focusing on creativity and original designs while continuing to preserve the traditional and ancient Ukrainian folk pysanka. I am creating contemporary expressions reflecting my ancient roots with new relevance for others and myself
Join Natalie Kit and other pysanka artists in the Ukrainian EggCessories' Eggers FB group by clicking and joining here: UKRAINIAN EGGCESSORIES' EGGERS
Natalie's personal facebook page https://www.facebook.com/NatalieKKit
Click here to see Natalie's "Anything is Possible - Pysanky video"
-------------------------------------------------------------


Comments will be approved before showing up.

Tamara
September 27, 2023
[url=http://etsy.com/shop/Pysankashop]
I am Pysanky artist from Ukraine, Kyiv. I make pysanky since childhood.
Welcome to my gallery![/url]